When I left Madrona, I knew there was a loom in my future, but with the recent hefty purchase of my rolling machine sitting heavy on my credit card, there wasn’t a lot in the budget for a floor loom, or even a table loom. Since I really, really wanted to try some more weaving, I took Syne’s suggestion that we build a standing pipe loom out of pvc pipe. The detailed instructions are included in Sarah Swett’s book Kids Weaving, whom Syne had just interviewed the previous week (check out Episode 24 of Weavecast).
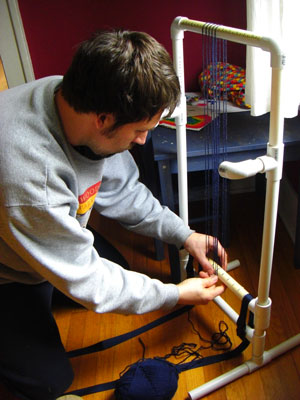
The components include a 10 ft piece of pvc pipe cut to specific lengths, some elbow and t-joints, 10 craft sticks, some masking tape, cotton cord, nylon strapping and buckles – total cost under $10. Once we had all the pieces under one roof, the assembly took ten minutes, and with the instructions for the simplest warp method, we were able to start weaving before the end of the afternoon.

As is frequently the case with such projects, we had to make two extra trips to the hardware store – once to get a couple of extra pieces of pvc because we lost some on the way home, and then a third trip because we lost one of the elbow joints on our second trip. I wonder if anyone playing in the horn section of our family band knows what happened to those missing pieces?

Sophie didn’t give me much of a chance to weave. She was on the floor before I could say ‘where’d my spot go?’ We didn’t notice the bit about craft sticks in the list of materials, and wouldn’t you know that is the one item I have never picked up for my stash? How did I go this many years without any tongue depressors in my inventory? Lance-to-the-rescue fashioned some dandy substitutes out of leftover wood from the garage, and I used cardboard strips for the spacers at the bottom of the warp.

Using handpainted yarn Syne provided at her workshop, Sophie illustrated the beautiful striping that can be created when it is used for the weft. Unfortunately, we didn’t read the instruction to cinch up the warp before beginning, so as her weaving became tighter the further she progressed, Sophie’s piece changed from broad and flat showing only thin stripes of colored weft to a very narrow band showing wide stripes of warp and weft. After eight inches, we tied it off and cut the warp.
 Later that same evening, I warped the loom while a movie was playing in the background. Admittedly, I’m not a great multitasker, especially when I’m trying to do something as complex as warping a loom for the second time, but this was really tough. It took me well over an hour to warp 30 ends of yarn, (down and under cloth bar, up the back and over the top, down and under the warp, back and up over the top, down the back and under the cloth bar…where was I?) and then another half an hour to tighten it all up. The author stated that this second warp method was more complex than the first, but it is supposed to provide more flexibility for weaving a variety of projects. Once the warp made the satisfying ‘sproing’ sound of a well strung guitar, I wove in the spacers at the bottom and set up the heddle. This when a feeling of dread started to creep in and settle around my shoulders.


Lance came over to watch me tie the last of the heddles in place and then move the heddle bar up and down. ‘Where are you supposed to put the shuttle?’ he asked. In the space that opens up ‘right there’, I said to myself . When the heddle bar is down, the shed opens near the top and you pass the shuttle through; then the heddle bar is moved to the ‘up’ position and the shed opens up…hmm.
See that neat little ‘x’ in the middle of my wide open shed? Yeah, I did too. I made a mistake. A big mistake. An unforgiveable mistake. It all needs to come apart, though it looks so lovely, and it feels so tight that I can’t bear to take it apart, yet. Besides, I haven’t finished spinning all of my handpainted roving yet, so I’m not really ready to weave, yet.


is it really so easy? (if i can learn from your mistakes that is) all your problems aside, what a great project to consider.
and your sweet horn player there might consider writing up a tutorial on how to make an instrument 🙂
That’s a creative solution! I can’t wait to see what you’ll create on this loom!
This is great info. Thanks for sharing.
I just finished making one of these with my dad, they are really cool!
I built one of these a couple weeks ago, after letting my copy of Ms. Swett’s book sit around for months.
I’ve been considering modifications (first off, longer bars to accomodate wider pieces).
Have fun!
creative idea to make from pvc pipe 😀