Archive for March, 2008

Handspun Squiggle Scarf

Hi this is Sophie, I wanted to blog for my mom today. Here is how to make a wet felted scarf with yarn laid in it:

squiggle1.jpg

We started with handpainted merino roving and handspun yarn that I spun with my mom.

squiggle2.jpg

First you draft some roving. Drafting is when you pull gently on the roving. Lay down a thin, uneven batt. Our batt was 72″x10″.

squiggle3.jpg

Now lay down some loosely spun yarn.

squiggle4.jpg

Now lay down another layer of roving over the yarn. Then lay down a nylon screen.

squiggle5.jpg

Squirt hot water on your batt .

squiggle6.jpg

Put melted olive oil soap on your hands. Rub the batt under the screen until wet and soapy all over, take off the screen .

squiggle7.jpg

Then roll the batt up in bubble wrap, then roll it up in a towel and roll some more .

squiggle8.jpg

Then unroll it, and check on it .

squiggle9.jpg

Now that it is completely felted, full it as shown above. Lay down a towel before fulling.  Fulling is when you throw your piece down from a high distance to finish the shrinkage . Our final piece was 47″x 7″.

squiggle_fin.jpg

Rinse out the soap and hang to dry.

YOU’RE DONE!

Felt Leaf Mobile

There is something so enchanting and relaxing about a mobile. When I saw this picture on Flickr last year, making my own leaf mobile jumped onto my mental to-do list, but something about the engineering of the piece held me back.

leaf_mobile_mosaic_sm.jpg

In the end it wasn’t difficult at all, though creating the leaves took several hours of felting, stitching and cutting. I used a little free-motion embroidery to create the abstract leaf shapes, dipping in and out of each shape, letting the machine and my intuition guide the stitches. By Sunday night, my shoulders were very sore because my seat/machine proportions aren’t right for hours and hours of sewing, but I couldn’t stop looking at the colorful pile of leaves I’d amassed.

Six Word Memoirs

I was listening to one of my favorite programs recently, and heard an interview with the editors of Smith Magazine. They were promoting their new book “Not Quite What I Was Planning: Six-Word Memoirs by Writers Famous and Obscure”, the premise being that reducing our lives to six words encourages us to be realistic about who we are, and the choices we have made (my analysis – not theirs). It got me thinking, hard. How would I summarize my life? What would my six-word memoir look like? Here are some stabs, by no means my final answer:

fiber_lover.jpgIntellectual discovers life and art while mothering.

Loner forced into life by motherhood.

Introvert speared by love, motherhood, art.

Discovered life and art in motherhood.

Mother keeps together body and soul.

Crafter turned knitter, felter and spinner.

Fiber lover gets tangled everywhere.

The editors suggested buying a few copies of the book, and the next time you’re late for a dinner party, bring a copy of this book in lieu of a bottle of wine. You’ll save fifteen minutes and you’ll start a conversation that will open windows into souls.

The caption for this photo should be: Uncontrollable fiber addict spins during St. Patrick’s Day festivities in Vancouver; temperature 42 degrees.

Engergized by Spinning

From roving to 2ply yarn to knitted cuff:

aquamarine_roving.jpg

aquamarine_yarn.jpg

aquamarine_cuff_twist.jpg

I am delighted with my results, as I can clearly see the progression in my spinning and plying in each hank. This cuff was knit with one of nine hanks; each hank took me between 2 1/2 and 3 hours to spin and ply on my drop spindle. I estimate the cuff used between 30 and 50 yards based on the one time I slowed down enough to count the loops on my niddy noddy.

The hank I used for this cuff appears to have a lot of twist still left in the yarn, though most of the hanks were balanced after washing and drying. I’m still not sure what size needles are best for the thick and thin yarn. The cuff was knit on size 6/4.0 mm dpn and the gauge measures around 4.5 stitches/inch; this was very tight for the thicker sections, but comfortably snug for the greater portion of the yarn. I’m tempted to rip it back and try knitting it on larger needles, but I worry that the thin sections will leave gaps.

This roving, which I bought on etsy from Dancing Leaf Farm, was so much fun to spin that I’m feeling a little bereft now that it is finished. The ball band wrapped around the roving claims this is ‘wool from free-range sheep with names’. Buying 8oz of handpainted merino roving for $19.50 is a great value, plus I love the idea of supporting a shepherd in Maryland. I just checked the shop, and there is another batch of the same colorway for sale. However, since I don’t have any specific plans for knitting this yarn, I’m going to hold off on buying any more. Last night, I spent my entire evening with the Fiber Gallery knitters, perusing books looking for ways to use a small bit of precious yarn. I’d love to hear how other spinners use their yarn and suggestions for the best way to make your wool go the distance.

Studio Tour

Thank you for all the name suggestions for my new rolling machine. My favorite was ‘Arachne’, suggested by Josiane from Montreal. The logic behind this name gives me shivers; I love the fact that it is both feminine and strong. I have to admit that I every time I hear the word Montreal, I get a little melancholy, as my favorite years as a young adult were spent there while attending university.

josiane_mosaic_sm.jpg

Josiane’s prize went in the mail last week: a felted flower on a wire stem and a Japanese book on simple felted jewelry. I’ve made almost everything in this book, so it goes with high recommendations (this is not my personal copy, but a thoughtful gift shared by Blair).

zakka.jpg

In honor of Josiane, who is interested in setting up her own felting studio, I thought I would take you on a tour of my workspace, finally complete.

studio_floorplan.jpg

This is a small room, measuring a little more than 8′ x 7′ with a narrow entry. The large x is a closet, inaccessible from this room. The space between the workbench and my storage shelves measures 36″. There is a small window with frosted glass (the former owners intended this room to be a bathroom) right behind Arachne.

Originally, I had hoped to have a sink for rinsing and filling up a kettle, but there really isn’t anywhere to put it, unless I move the storage shelves out. Considering this room was previously used for storage, and most of those items are now in our family room, there really isn’t anywhere else to put the boxes of roving. Besides, I really like the easy access I get from pulling boxes off the shelf behind me.

studio_mosaic_sm.jpg

  • Starting from the top left, Arachne, the rolling machine is now mounted on a base which is easier on my back, and has room for a drip tray. Lance reworked and reinforced the shipping crate to make the stand.
  • sturdy workbench built with removable top, 4×4 posts, upholstered with high density foam and waterproof sailcloth
  • vintage whiteboard from Shirorusty and encaustics from Marysusan
  • crazy cat hanger used to store lariats
  • one wall of the narrow entry is the back of Lance’s closet with bare metal studs
  • pieces of art felt are tacked up to remind me of where I’ve been, what I’ve made and what is yet to be completed
  • a deep shelf under the workbench gives me storage for towels, rolls of bubble wrap, bamboo mats and empty boxes
  • tubs full of teaching materials are stored below so I can quickly pack up the car for a class
  • a flexible IKEA shelving unit was easily customized to include a small shelf for reams of tissue paper used to gift wrap my sales; bottles of vinegar and bars of soap are stored below.
  • above the workbench are three open shelves filled with materials, completed projects and items in process; a sale that didn’t go through is already wrapped and ready for shipping; abstract landscape prints by BudanArt are hung at eye level; baskets filled with felted soaps in progress hang from the bottom shelf
  • squeeze bottles, felted flowers, needle felting tools, scale, colorful chalkboard painted with tropical fish by Zoë Young
  • color samples of roving hang on a curtain wire from IKEA above Arachne and the window
  • lots of and lots of Kiss My Face soap
  • end of workbench, art and love created by my children, clock from Good Kismet
  • carafe for storing hot water, a small coffee urn used for the vinegar rinse, a Y2K champagne bucket fitted with an aluminum colander for draining wet felt; a plastic tub full of water for the final rinse and a 5 gallon bucket full of liquid olive oil soap are tucked in the bottom shelf to the left of the carafe; all of the items in this picture were upcycled or thrifted
  • banker’s boxes filled with roving filling a large IKEA storage unit

Full-size versions of these photos can be seen in my Flickr set labeled ‘studio’.

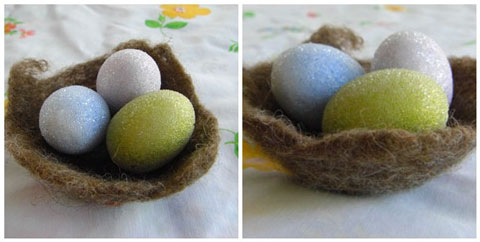
Felted Bird Nests

My daughter’s second grade teacher approached me several months ago wondering if I could help the kids create felt bird nests to go with a math game they were learning. Though I had never attempted a nest, anything is possible with felt, and I never turn down an opportunity to spread the gospel of felt with children.

nest_littlemosaic_sm.jpg

We started by laying out a couple of small batts in the traditional method with four crisscrossed layers. Since birds love to add soft things to their nests, we also added bits of thread, yarn and fronds of pampas grass. The small bowls were used as both a mold and vehicle to contain the water.

nest-batt.jpg

Once the batts were complete, they were placed over the bowl where we squirted a small amount of hot water into the center. The small batts naturally bowed with the weight of the water, creating an indentation.

nest-wetbatt.jpg

With soapy hands, we gently worked around the edge of the bowl pressing fingers to the sides to spread the moisture and soap. This was tricky for several children who found the wool sticking to their fingers. An extra set of more experienced hands was enough to get the process underway without tearing the batt to pieces.

nest-moistensoap_sm.jpg

When the felt was evenly moistened, we pulled the piece out and placed it on the outside of the bowl as it was easier to work with a convex shape.

nest-handbowl_mosaic.jpg

We patted and rubbed the bowl for a couple of minutes until the felt started to feel solid.

nest-fist.jpg

The last bit of felting was done on our fists because we could work it from the inside and out.

nest-class.jpg

Everyone was delighted with their finished product. There was a lot of variety in size, shape and color, much as you find in the wild. We worked with a mixture of Jacob roving, carded merino roving from Copperpot and a miscellaneous dyed wool blend from New Zealand I bought at my local fiber store.

nest-classmosaic_sm.jpg

From the top left: Jacob and Sean work next to Dominic felting over his fist; Zoe finishes her nest on her fist; Madeleine cuts strands of yarn to layer in her batt, Dominic and Sean work with two different sized forms; Sophie pours water on Sophia’s batt, Jacob felts while Sean lays out his batt; Marlene felts her bowl while Madeleine and Sophie work together to moisten a batt; Sophia works around her bowl; Louis finishes his bowl on his fist.

Building a PVC Pipe Loom

When I left Madrona, I knew there was a loom in my future, but with the recent hefty purchase of my rolling machine sitting heavy on my credit card, there wasn’t a lot in the budget for a floor loom, or even a table loom. Since I really, really wanted to try some more weaving, I took Syne’s suggestion that we build a standing pipe loom out of pvc pipe. The detailed instructions are included in Sarah Swett’s book Kids Weaving, whom Syne had just interviewed the previous week (check out Episode 24 of Weavecast).

lance_warps.jpg

The components include a 10 ft piece of pvc pipe cut to specific lengths, some elbow and t-joints, 10 craft sticks, some masking tape, cotton cord, nylon strapping and buckles – total cost under $10. Once we had all the pieces under one roof, the assembly took ten minutes, and with the instructions for the simplest warp method, we were able to start weaving before the end of the afternoon.

pipe_trumpet.jpg

As is frequently the case with such projects, we had to make two extra trips to the hardware store – once to get a couple of extra pieces of pvc because we lost some on the way home, and then a third trip because we lost one of the elbow joints on our second trip. I wonder if anyone playing in the horn section of our family band knows what happened to those missing pieces?

sophie_weavemosaic_sm.jpg

Sophie didn’t give me much of a chance to weave. She was on the floor before I could say ‘where’d my spot go?’ We didn’t notice the bit about craft sticks in the list of materials, and wouldn’t you know that is the one item I have never picked up for my stash? How did I go this many years without any tongue depressors in my inventory? Lance-to-the-rescue fashioned some dandy substitutes out of leftover wood from the garage, and I used cardboard strips for the spacers at the bottom of the warp.

weave_sample.jpg

Using handpainted yarn Syne provided at her workshop, Sophie illustrated the beautiful striping that can be created when it is used for the weft. Unfortunately, we didn’t read the instruction to cinch up the warp before beginning, so as her weaving became tighter the further she progressed, Sophie’s piece changed from broad and flat showing only thin stripes of colored weft to a very narrow band showing wide stripes of warp and weft. After eight inches, we tied it off and cut the warp.

green_warp.jpg Later that same evening, I warped the loom while a movie was playing in the background. Admittedly, I’m not a great multitasker, especially when I’m trying to do something as complex as warping a loom for the second time, but this was really tough. It took me well over an hour to warp 30 ends of yarn, (down and under cloth bar, up the back and over the top, down and under the warp, back and up over the top, down the back and under the cloth bar…where was I?) and then another half an hour to tighten it all up. The author stated that this second warp method was more complex than the first, but it is supposed to provide more flexibility for weaving a variety of projects. Once the warp made the satisfying ‘sproing’ sound of a well strung guitar, I wove in the spacers at the bottom and set up the heddle. This when a feeling of dread started to creep in and settle around my shoulders.

green_warpcu1.jpggreen_warpcu.jpg

Lance came over to watch me tie the last of the heddles in place and then move the heddle bar up and down. ‘Where are you supposed to put the shuttle?’ he asked. In the space that opens up ‘right there’, I said to myself . When the heddle bar is down, the shed opens near the top and you pass the shuttle through; then the heddle bar is moved to the ‘up’ position and the shed opens up…hmm.

See that neat little ‘x’ in the middle of my wide open shed? Yeah, I did too. I made a mistake. A big mistake. An unforgiveable mistake. It all needs to come apart, though it looks so lovely, and it feels so tight that I can’t bear to take it apart, yet. Besides, I haven’t finished spinning all of my handpainted roving yet, so I’m not really ready to weave, yet.

Nunofelted Curtains

As the spring flowers start to bloom in the garden, I know warmer seasons are on their way and then end of scarf season in the Western hemisphere is nearly upon us (I’m counting on the Australians to keep my scarf business alive through mid-August).

painted_crepe.jpg

I ordered a bolt of silk chiffon from Dharma Trading after making this scarf in a fantastic class at Space to Create. We used a soy-wax resist to create designs on handpainted silk scarves; taught by Cameron Mason, an eminent fiber artist, this is a great class for anyone in the greater Seattle area (sign up for their mailing list to hear about the next session). Cameron provided us with two silk scarves for the class, and naturally my mind started to think about what I could do with a larger piece of silk. The idea of making delicate window coverings started to float around in my brain.

blue_greenleaf.jpg

My fabric order arrived on Tuesday in the middle of the felted egg activity, and by late Tuesday afternoon I finished my first curtain. I drafted small strips of handpainted roving and laid them across the width of the silk, then scattered some cutouts from my scrap basket. Some of the shapes were trimmed to be vaguely leaf shaped, but most were just triangles and random bits of felt in shades of dark blue and green. It took very little work to get the wool fibers to penetrate through the silk. A single wide hem along the top was enough for a simple cafe curtain rod.

burgundy_fallleaf.jpg

This small south-facing window is right above my desk, looking out into the backyard. Around noon, the winter sun shines in at just the right angle to blind me when I’m working on the computer, so a small sheer curtain is crucial for this window. Once the first silk curtain was finished, I wondered what would happen if I nunofelted the old curtain that was in the window.

Have you ever bought standard cotton curtains from IKEA? They are usually sold in 98″ lengths so they can be cut to size at home. We have at least four sets of these curtains in our house, and none of our ceilings are nearly tall enough to justify that towering length, so I have several yards of leftover cotton gauze which I’ve used for several different projects.

This time, I cut leaves out of a piece of gold felt shot through with burgundy and red; the strips are burgundy merino. When I hung it back up on the same curtain rod, I was astonished to see just how much it had shrunk in both width and length, despite what I already know about nunofelting (it gets me every time!). Heed my words if you decide to try this yourself: make sure your fabric is at least 10″ wider and longer than the finished dimensions you hope to achieve. The amount of time you work the fabric and the amount of wool you lay on the fabric will affect the size of your final piece.

There are at least four more small windows in my house that could use a similar window covering (bathroom, kitchen, two back doors). When I’m done experimenting with colors and styles, I’ll start offering them for sale in my etsy shop. In the meantime, sign up for my nunofelting class on March 26th to experiment with a variety of sample fabrics.

March Felting Classes

The next two felting classes will begin soon:

felting101mosaic_sm.jpg

Felting 101 – Beads, Ropes and Flat Felt
Wednesday, March 19th, 7:00 – 9:00 pm
Cost: $30 plus $10 materials fee
Class size is limited to 10 students.
A hands-on introduction to basic wetfelting techniques. Topics covered include creating felt beads, ropes and flat felt. Each of these building blocks will be used in subsequent classes to create more complex constructions. Students will complete two projects during the class time such as a three-tier flower brooch, a felt box or a neck cozy. Materials provided include 3 oz. of wool roving, bubble wrap, and a square nylon fabric screen.

nunofelting_mosaic_sm.jpg

Nunofelting
Date: Wednesday, March 26th, 7:00 – 9:00 pm
Cost: $30 plus $10 materials fee
Class size is limited to 10 students.
Students in this class will learn the technique of Nunofelting, which pairs merino wool with loosely woven fabrics such as cotton gauze or silk charmeuse resulting in a fabric that is both fine and flexible. Depending on the manner in which the wool is laid out, the fabric will constrict, pucker, crinkle or wave; finished products range from ruffled scarves to translucent window coverings. Students will test various methods for laying out wool on strips of silk, experimenting with form, shape and fabric. Prerequisite: Felting 101 or equivalent experience.

Both classes are taught at Venue, 5408 22nd Ave NW, between Ballard Ave and Market. Register by phone: 206-789-3335.

Rub a Dub Dub; Six Kids and Some Felted Eggs

Monday afternoon: Tera, mother of three and veteran homeschool goddess sends me an e-mail asking whether I had plans for our monthly AP craftgroup meeting on Tuesday. Could we felt Easter eggs? Sure! I love it when other people come up with the ideas. Providing the materials is the easy part.

Monday evening: I share with Lance my checklist of things I need to do the next day. First on my list, before picking up all the teensy toys with small parts, is a stop at the drugstore to get some plastic eggs. After a moment’s hesitation, he said ‘I guess I don’t need to hold on to this surprise any longer’ and plunged head first into his closet, emerging a couple of minutes later with a box of styrofoam eggs he’d picked up on clearance in May 2007, intending to surprise me this year with a set of felted eggs. I gulped and gushed simultaneously, apologizing for all the times I’d complained about his habit of hording and stashing seemingly useless ephemera.

egg_box.jpg

Tuesday morning: clean, tidy and organize the house in preparation for curious children and watchful (though forgiving) parents. Bring wool, towels, styrofoam eggs, nylon stockings, liquid soap, squeeze bottles, ribbon, scissors and needles upstairs.

egg_mosaic2_sm.jpg

In the interest of time, I decided it was better to use solid forms for the eggs, rather than try to create an entirely wool egg. A couple mothers brought plastic eggs, which we wrapped with masking tape to give the wool some purchase; the rest of us used the colored styrofoam eggs.

We drafted small amounts of wool roving and then wrapped it around the eggs. It is challenging to get a round form evenly covered with drafted roving. The little hands needed help with drafting and wrapping their eggs to ensure there was enough wool and thorough coverage.

Once wrapped, we carefully stretched a nylon stocking to create a large enough opening for the egg, trying not to disturb the roving as we placed the egg at the toe. Once in place, we tied a knot as close as we could get it to the egg, then squirted hot water over the little package. Dipping our hands in liquid olive oil soap, we started to rub a dub dub.

egg_mosaic1_sm.jpg

This is where the fun began and the tedium set in. Lots of kids like to dip their hands in the soap and love the suds they create, but after 30 seconds of rubbing, they start to wonder how soon the egg will be done. Realistically, it takes five to ten minutes of rubbing before the process is completed. I made one egg as a demonstration, and finished four eggs begun by the children.

egg_mosaic3_sm.jpg

I found it more effective to remove the stocking after a minute or two of rubbing, once the wool was no longer slipping around on the egg so I could felt it on my hand, rolling around the shape, applying equal pressure to the entire surface. Both times I left my egg in the stocking, they grew little spikes on the top, which I cut off and then felted the cut edge.

The pink egg was my favorite. This mother was pulled away from her task repeatedly by her children, forgetting when she returned to it how long she had already spent rubbing, effectively felting it much longer than the rest of us. I’m always amazed at just how good felt looks when it is really worked for a long time (note to self: hang in there longer than you think necessary). Check out Carrie’s post for her description of the morning.

Tune in next week for the follow-up installment: felted bird nests with my daughter’s second grade class.


Flickr Photos

Categories