Archive for the 'tutorial' Category

Felting a Sheepskin, Minus the Skin

There are projects and then there are projects that live in your dreams. Felting a large sheepskin, a fluffy felt rug, has been on my to-do list just about since I started felting. For one reason or another, I put it off. I was intimidated at the prospect of working with a raw fleece, full of vegetable matter and animals waste. But a trip to Lopez Island,  where I met Maxine of Island Fibers, followed by a peek at the work of a Dutch feltmaker was just the push I needed to get started*. I bought a  Rambouillet fleece in the grease, plus some shiny Border Leicester locks from Maxine.

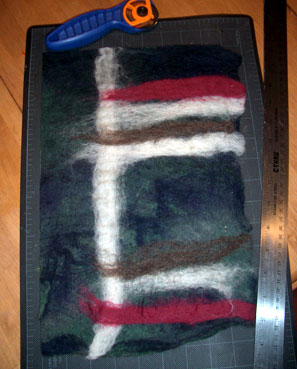
I started with my largest piece of bubble wrap, also sold as solar pool cover, then laid down a small bamboo blind followed by a long sheet of 2mm plastic. I laid out a layer of fine merino top to create the base for my sheepskin. To keep the shingles of wool from blowing away, I sprayed down my work with soapy water every 15 seconds.

Next, I pulled out a bunch of Rambouillet locks. This must have been a very young sheep, or else a very tidy specimen because the wool was so clean the locks didn’t really hold together when I pulled them out of the bag. I was hoping to keep the locks intact, but there wasn’t enough matted wool.

Once the wool was wet and soapy, I folded the plastic over the top of the wool and then rolled up the bamboo blind, tying it together with three strips of fabric. Using my legs to roll, since I didn’t have a table set up outside, I ran out of steam pretty quickly. Two sessions of rolling for four minutes was about all I could handle. The bundle flattened out quickly and I was worried about the felt shifting inside the bundle. So, I unwrapped the package in order to work it flat for a bit.

Working it with my bare feet was the most glorious part of the process. If you don’t know the feeling of wet locks between your toes, you haven’t lived. It is better than sand, much better. The wet, soapy plastic was pretty slick; it crossed my mind that landing flat on my behind in a puddle of dirty water would be an inglorious end. It was tough to tell whether I was doing much besides washing the wool. From the color of the water puddling in the solar pool cover, it was obvious that a lot of matter was coming off the fleece.

After a few minutes of slipping and sliding, I moved inside. I rinsed the fleece gently in the laundry sink, then rolled it up in another piece of bubblewrap to work it in my rolling machine. After twenty minutes rolling slowly, I pulled it out to full it on my glass washboard. This took another thirty minutes, with lots of extra hot water and olive oil soap. I had just enough time to rinse and spin it in the washing machine before leaving to pick-up my son from school.

The resulting fleece was close to what I had imagined. I couldn’t stop fingering the locks once I made it back home. The locks are incredibly soft, impossible to resist. This is not a perfect piece, but it is a great start and I have lots of great ideas for the next iterations.

Next time, I will add another layer of merino, perpendicular to the first to give the locks a slightly thicker base. I was really hoping to get lots of long locks standing up from the fleece. Instead, I have patches of locks with patches of felt bubbles. My guess is that the long locks are from the dirtiest bits which were matted together with lanolin and dirt. The cleanest wool felted to itself, creating the flat portions. Seeing how well some of the wool felted, I will spread out the wool before I start to lay it out so I can separate the cleanest wool from the dirty locks, to create a middle layer of clean wool in between the merino wool top and the locks.

In the meantime, I have a lovely faux sheepskin to cover the cracked vinyl upholstery on the drivers’ seat of my Volvo wagon.

*In the interest of full disclosure, this is not intended as an authoritative tutorial as it was my first try working on something outside of my experience. I documented my process and examined the results to see what I could learn. I’m sharing my observations to encourage anyone else interested in trying. Inspiration and direction was gathered here and here.

*April 2011 update: after watching Tricia Stackle‘s no-roll method of felting, I’ve given up rolling my sheepskins in a blind or bubblewrap. Rub-a-dub-dub, it is all in the hands.

Stencil Day

Two weeks ago, I offered to teach the parents in our Attachment Parenting Craft Group how to create freezer paper stencils.

We started with graphics I downloaded from Stencilry; another source is Microsoft Clip Art.

jennifer.jpg

Jennifer had great success tracing cookie cutter animals and cutting out the image with scissors; she made nine shirts with her older son after trying unsuccessfully to get an image cutout with my dull Exacto knife blade.

freezer_paper.jpg

Freezer Paper is coated on one side, and plain paper on the other. It is available in most grocery stores.

brush.jpgink.jpg

Tools of the trade: freezer paper, a wide sponge brush, and fabric paint. Versatex is sold at art supplies store as a silk screen ink; Artist and Craftsman Supply in the u-district sells a 4 oz bottle for $4.49. The ink is very thick, creating a nice opaque finish on a dark shirt, just be careful that it is applied in a smooth, even layer. Neopaque by Jacquard is a fabric acrylic; I found this 2.25 oz jar at Pacific Fabricsfor $4.99. It has a very thin, watery consistency, which seeped under the edges of my stencil, and dripped on the t-shirt when I tried to pour it onto my sponge brush; I wouldn’t recommend it, though if it is the only thing available, it will do the job. SoSoft by DecoArt had the best consistency of the three, though I had to apply several coats to get the coverage I wanted. The squeeze bottle made it easy for little hands to use, without risking a large spill. It cost about $1.50 for a 1 oz bottle at JoAnn Fabrics.

If you are just getting started, I would recommend SoSoft because you can get several colors with little upfront investment to see if you enjoy the process. Don’t forget to pick up some new blades for your Exacto knife while you are out.

rema.jpg

Alden chose a fish, which Rima traced and then cut out with the Exacto knife; Alina stayed close to her mom offering moral support and encouragement.

alden_sm.jpggreen_fish.jpg

When the design was cut out, Alden ironed the freezer paper to his mom’s shirt, and then ironed the negative to a piece of fabric. Make sure the iron is really hot, to ensure a firm seal on the inside edges.

He used a wide paint brush to move the ink around after squeezing it out of the bottle. We hung the shirts up to dry, and then two weeks later, peeled off the freezer paper. The ink should dry in less than eight hours, though the directions specify 24 hours. Fabric paints need to be heat set, so run the hot iron over them after you have peeled away the paper.

blue_fish.jpggreen_fish_shirt.jpg

Rima said she has the perfect shirt in mind for the fabric patch, and her well-love shirt just got a little brighter.

My apologies to any faithful readers who have seen bits of this process repeated on previous posts. A new mom to our group asked today if all of the info was in one place, and I realized I didn’t really have it collected in a single post. There you are Paola! You are ready to go!

Freeform Flower

I think this is one of those posts where pictures say more than 1000 words. This was my process for creating a 3D felt flower out of the scraps leftover after creating my first flower from a single piece of thick pre-felt.

freeflower1.jpg

This is the base of the flower, upside down, since I’m forming the bottom of the batt.

freeflower2.jpg

Lay some scraps on top of the tiny little batt.

freeflower3.jpg

Add a little yellow for the stamen.

freeflower4.jpg

Put the dowel in the middle, pour hot, soapy water on the middle and load up the bubble wrap.

feltflower6.jpg

Wrap up the flower; roll, roll, roll.

freeflower5.jpg

Unwrap often to check the progress; pull apart the leaves if they start to stick to each other too much. The petals of this flower look very wispy because I started with such a thin batt.

freeflower_fin.jpg

Stop when it looks finished. I needle felted several flowers and some buds made out of scraps to a long, thin felt rope; then added some freshwater pearls and called it good.

flower_lariat_sm1.jpgflower_lariat_long_sm1.jpg

Forming Felt Flowers

I’ve started experimenting with forming three dimensional objects, specifically felt flowers. Following are some pictures from my work in progress:

feltflower1.jpg

1. After creating a multi-layered batt, I squirted it with a solution of hot, soapy water, then rolled it in a rectangle of bubble wrap.

feltflower2.jpg

2. I unfurled the bubble wrap after rolling it back and forth fifty times to check on the progress. Since I want this to continue felting in a 3D shape, I decided to stop before the piece of flat felt became too rigid.

feltflower3.jpg

3. Needing a rough guide for cutting, I created a template out of a recycled cereal box and laid it over the flat felt.

feltflower4.jpg

4. Cut away the shape.

feltflower5.jpg

5. Fold it over a thin dowel and load it up with more hot, soapy water solution.

feltflower6.jpg

6. Wrap it up again, this time securing it with rubber bands to keep the package secure; roll, roll, roll.

feltflower7.jpg

7. Unwrap to check on the progress; the flat felt should start to become solid around the end, and the petals will start to stick to each other.

feltflower_fin.jpg

8. Stop when it achieves the shape you like and hang to dry.

bendy_stemsm.jpg

To finish this piece off, I created a stem by wrapping roving around a piece of floral wire. A tip I read in Hand Felted Jewelry and Beads by Carol Huber Cypher suggested wrapping the wire in floral tape to help the wool adhere to the wire. Make sure you bend the tips of the wire to create a blunt end. The stem is attached to the flower with a little needle felting and voila!

bendy_flower1.jpg

Making a Piece of Flat Felt

I recently posted pictures of a box I created from a piece of flat felt. It seems only right to show the steps involved in creating a piece of flat felt. My method is derived from instructions available on Pat Sparks amazing Feltmaker’s List FAQ. Variations on these instructions are provided in the first two books I picked up: The Art of Feltmakingby Anne Einset Vickerey and The Weekend Crafter: Feltmaking: Fabulous Wearables, Jewelry & Home Accents by Chad Alice Hagen.

Start by laying out a batt with alternating layers of wool roving. If you want a heavy, thick piece, try using a coarse wool like Jacob or Icelandic. I wanted my piece to be supple and pliable enough for sewing, so I used dyed New Zealand merino wool top. I also wanted it to be fairly thin finished, so I created two layers with my green base color, and then added bits of accent color and silk noil. Four layers of merino will give you a thicker fabric that is still very soft. Pat Sparks also has a great reference chart listing how well various wools felt.

flatfelt2.jpg

Pour a little hot, soapy water over your batt. I use a squeeze bottle because I can control how much water I add to the pile. You can’t really go wrong with soap, but in this very first round, you don’t want the fibers swimming in water as they won’t hold together as you’ve placed them.

With a sheet of bubble wrap under my batt, and a piece on top, I rolled it up using a wooden handle I stole from our croquet set.

flatfelt3.jpg

Roll this package back and forth until you are bored, which isn’t very long for me.

flatfelt4.jpg

Unroll the bundle to check on the progress. Tuck in the wispy ends if you want a clean edge, pull and tug it square if you are hoping for a uniform shape, and rotate it 90 degrees to ensure even felting throughout the piece. Add more soap and hot water to help the felting process along; the excess will squeeze out the ends of your bubblewrap bundle.

flatfelt5.jpg

Repeat the process several times until the piece feels finished. If you plan to cut out the felt to use as inlay, you may want to stop as soon as the fibers start to hold together.

flatfelt_fin.jpg

To achieve a firmer piece of fabric, you will need to spend some time fulling it, which for me, means just rolling it up and working it longer; other options include throwing or dropping the piece of felt, or rubbing it on a washboard. 

Flat Felt Box

What do you do with a big piece of uninspired flat felt that has been hanging on your felt clothesline for too long? Applehead had a great idea, but I wanted something that required a little less measuring and cutting, so I worked out this alternative. There are four straight seams, which can be done with a sewing machine or by hand.

flat_box.jpg

Trim the long edges as these will be your side seams. The short sides can stay wavy to give the top edge a sculptural look.

flat_box_seaminstructions.jpg

Seam the sides, and then create two triangles on the bottom. This will take a little pinching and fiddling, but you should be able to get a nice triangle; the size of your triangle will affect the shape of your ultimate box. If you want something square, your triangle needs to be fairly deep; a shallow triangle will create a box that is more rectangular.

flat_box_bottomview.jpg

You can either tack down the little flaps with a couple of stitches, or trim them off.

flat_box_bottomseam.jpg

The bottom and side of your box will look like a neat “T”.

flat_box_right.jpg

The Felt Box from the right,

flat_box_left.jpg

and the Felt Box from the left.

I love this shape so much, I plan to make many more pieces of flat felt just so I can seam them all up. These will make great project baskets to further clutter the area around my easy chair.

Orange Leaves Unfurl

I’ve had a few questions asking how to create the vase I’ve created in a few iterations recently. There is a tutorial here demonstrating the first seven steps which bring you to this point, where the vessel is ready for adornment with more felt.

leaf_vessel1.jpg

Once you have created the felt package using two batts wrapped around your cloth or plastic resist, you need to work the felt just a little to get the fibers to mesh together. Lay your package down on some sort of textured surface,

leaf_vessel2.jpg

roll it up and then rock it back and forth for a few minutes. Add hot, soapy water several times to help the fibers on their way towards felting.

leaf_vessel3.jpg

Cut out the shapes you want to layer out of a piece of loosely held together felt. This sheet of felt was created out of two layers of roving that were very gently agitated under a piece of rubber mat until they barely held together. You can also buy pieces of felt in this stage, sometimes called pre-felt.

leaf_vessel4.jpg

Place the cut-outs wherever you choose, then gently roll them up in the mat again, being careful to keep their position intact. Pour more hot, soapy water over the matt and rock back and forth for a few minutes.

leaf_vessel5.jpg

When you check on the piece, it should look like this. Notice the horizontal imprint from the mat.

leaf_vessel6.jpg

It is now time to cut open a slit at one end of the vessel and remove your resist.

leaf_vessel_stuffed.jpg

Slip a soapy hand inside the vessel and continue agitating from the inside and outside at the same time. You can rub the bottom of the vessel on a washboard to force it to shrink in a certain direction, but be careful of the layered elements. These should be rubbed with plenty of soap on your hand to keep them from being pulled right off the piece.

leaf_vessel_finished.jpg

When you can pick up the piece by any of the fibers, without them pulling away from the surface, you know you are done.

Felt Vessels

Next on my list of fun projects is a simple felted vessel; you can create a bowl, vase, hat or slipper with this method.

felt_vase_sm3.jpg

1. Start with four layers of roving, laid out so the fibers within each layer lie perpendicular to each other, in the basic shape of your ultimate creation; this is called a batt. Create a second batt of the same size and set it aside. To get a sturdy vessel, use more layers of felt and choose a roving with long, thick fibers.

batt.jpg

2. To create a hollow object, you need a resist, either a piece of cotton fabric or plastic cut a little smaller than your batt. Lay the batt over your resist and then wet it gently with hot, soapy water.

vessel_stage1.jpg

3. Flip the batt over so the resist is face up.

vessel_stage2.jpg

4. Fold the edges of the batt over the resist.

vessel_stage3.jpg

5. Layer your second batt over the resist.

vessel_stage4.jpg

6. Wet it again and then flip the whole affair over.

vessel_stage5.jpg

7. Fold the edges once again so you have a smooth blob which is still very loosely put together.

vessel_stage6.jpg

8. At this point, it is helpful to put some sort of screen over your piece so you can agitate it gently without moving the fibers. cimg7570.jpg I use a long piece of webbed non-skid carpet underlay, the sort you use to keep an area rug from sliding around on your hardwood floor. You can also use a bamboo blind, a sushi mat, or any type of cloth netting. Roll your bundle in the screen, pour a little liquid soap over it and then roll it back and forth for five minutes.

Unroll it periodically to check on the progress; if the fibers seem to be holding together you are ready to move on to the next stage. Ultimately, the longer you work the package while rolled in the netting, the stronger the finished product will be.

cimg7579.jpg

9. Cut one end of your package and remove the resist. Now you are ready to work the vessel from the inside and the outside at the same time.

cimg7585.jpg10. Rub the vessel vigorously on a washboard until you achieve a firm fabric. Be sure to rotate the vessel so that all sides are felted evenly.

Felt will shrink in the direction you are rubbing, so this is where you can adjust the height or width of your product. In this illustration, the piece will shrink in length. If I want it to shrink in width to create a skinnier piece,  rotate it 90 degrees.

You can embellish your piece with wispy bits of roving, or cut-outs of pre-felt, but getting them to adhere can be a bit tricky depending on how sturdy your piece is. You can also layer a few bits of colored roving in the original batt, which will create a mottled look.

cimg7587.jpg

*Edit: Rinse your piece when it has achieved the firmness you desire. A final rinse in a vinegar bath will restore the pH of your felt and harden the final piece, making it less likely to pill or shed fibers.

felt_vase_sm2.jpgfelt_vase_sm.jpg

In the end, I needle-felted accents after the vase was dry, which allowed me more control over the swirling design.

Felt Treasure Box

We opened the felting workshop again today for our friends Wendy, Abigail and Lilli. They weren’t able to come in November when I showed the adults in our knitting group how to felt with roving, but were very excited to try it out. I thought it would be fun to start with a treasure box because it is small and doesn’t take long to execute.

felting_workshop.jpg

Lilli and Abigail started by wrapping a wooden alphabet block with several layers of wispy white roving. Since the fibers were fairly short and the roving wasn’t combed like the colorful bits hanging behind us, we wrapped pencil roving around the blocks to bind it all together. Pencil roving is sold at yarn stores in large rounds that remind me of cow pies.

The next step is to dip your hands in liquid soap and then pour a little hot water over the cube, just enough to moisten your bundle. We make our own liquid soap by grating 8 oz of pure olive oil soap into 3 cups of hot water on the stove. The soap will slowly dissolve and create a uniform liquid which you can pour into containers once it has cooled. We keep our soap in recycled yogurt containers with lids for easy dipping and storage.

felting_fun.jpg

Lilli loved dipping her hands in the slimy soap mixture.

felting_icky.jpg

Abigail thought it was gross.

felting_pro.jpg

Sophie raced on ahead confident that she knew what to do and didn’t need to wait for everyone else.

After the first layer of roving has started to felt, you can add additional layers to make the box more sturdy and colorful.  Abigail and Lilli loved choosing new colors from the rainbow roving clothesline.

This is the point where you need to work carefully as the later layers can easily form dreadlocks, felting to themselves instead of to the first layer of felt. Dip your hands in slime and a little hot soapy water, then gently pet the new fibers into place over the first layer of felt; rub the cube gently, trying not to lift up the new fibers. 

wrapped_felt.jpg

If you start to see the fibers separating, wrap more pencil roving around the cube, or just take a bigger piece of drafted roving and wrap it around the entire cube, then start petting the new layer again. You may have to repeat this step more than once until you become familiar with the technique. Trial and error are the best teachers.

twisting_felt21.jpgtwisting_felt1.jpg

Each layer of roving will take at least five minutes of constant agitation. Turn the cube over in your hands so every side gets equal attention, or twist it in a circular motion between the palms of your hands. You can try rolling the cube on your tray, or squeezing it between your hands when you start to get tired or bored. Sophie, who is in first grade, can usually stick it out for the whole project, but Owen’s more active body can’t last that long.

Periodically dip your hands in the soap slime then pour fresh hot water over your cube, all the while rubbing it vigorously. Use the hottest water that your hands can stand; it will help the felt to form more quickly. Pour off any cold water that has collected in your basin or pan.

Your felt has felted when you can pick up the cube by pinching just a couple of fibers. When the felt is firm, the fibers will stay attached to their nearest neighbor; if the felt seems to pull away from the cube, then you need to go back to the soap, hot water and rubbing routine. Expect a small treasure box with three or four layers of felt to take around 30 minutes to complete. Blot the finished cube on a towel and set on a windowsill to dry.

treasure_box.jpg

Lastly, slice three sides of the cube with sharp scissors, being careful to get the innermost fibers and then extract the wooden block.

Dipping Beeswax Candles

Every Tuesday morning, I host a knitting group for crafty parents at my house.

felting_knitting.jpg

The common denominator for this group is the Seattle chapter of Attachment Parenting International. I have been part of this community since Sophie was a baby; now that my children are in school, it is time for me to give something back to the parents who are new to the parenting journey. I love the mix of babies in slings, nursing toddlers and motoring pre-schoolers zooming around the house as we try to squeeze in a row or two of knitting, and a little fiber talk.

This week, our normal group took a break to create beeswax candles at Jen and Matt’s house with their boys, Cuinn and Kevan.

The first step in dipping candles is to melt the beeswax. Jen started the process at 7:30 am, estimating it would take several hours to melt. They buy large chunks of beeswax from a gentleman who sells honey by the gallon from his home in Lacey, WA; this wax is unfiltered, so it still contains chunks of pollen. Mmmmmmm. The smell is heavenly.

beeswax_melting.jpgbeeswax_melted.jpg

Once the wax is melted, cut a piece of wick twice as long as your dipping container, with a little bit extra for holding; in our case, we cut six twelve inch pieces. Dip the wick in melted wax three times, letting it drip and cool a little in between each dip. The first time it will barely look like the wick has any wax coating. Jen recommends dipping quickly to ensure even distribution of the wax. If you leave the wick in the wax too long, the early layers will melt back into the pool.

beeswax_candles1.jpg

Jen rested a large dowel between two shelves in her kitchen doorway, next to the stove. I dipped each pair in turn, placing them on the dowel to cool after a double dip in the wax. By the time I was done with the sixth pair, the first was cool enough for another bath. After each of these early dips, straighten the wicks by hand, or roll them on a counter, as they will naturally curl and bend.

Did I mention covering the floor with newspaper? There will be plenty of drips along the way, so unless you enjoy scraping your linoleum with your fingernails, tape down a layer of newspaper.

beeswax_candles2.jpg

Periodically trim the bottom of your candles to remove the little “nipple” that develops from the drips; this will ensure that you are dipping the entire candle.

Continue dipping each pair, topping up the container as necessary to keep the level of wax right up to the brim, otherwise your candles will be much wider at the bottom than at the top.  

After an hour of dipping, I had six pairs of beautiful beeswax candles.

beeswax_kids.jpgkevan.jpg

I couldn’t resist including a couple of pictures of Cuinn (the elder) and Kevan (the younger), our young apprentices. These adorable boys are incredibly fortunate to grow up in a house with creative parents who have put their children foremost in their tender years. It is a joy and a pleasure to see them every week.

Thanks for hosting Jen and Matt!


Flickr Photos

Categories